Contents
- Learning objectives
- Introduction
- Visual Studio Code (VSCode)
- Downloading VSCode
- Install extensions
- Testing
- Do NOT Create Java Projects
- References
Learning Objectives
- Understand how code goes from editing to running.
- Install VSCode to edit Java source code.
- Install Java extension to compile and run Java code.
Introduction
Making a program in the “golden days” meant writing 0s and 1s. Now, we have tools, called compilers that will translate the higher level language, such as Java, into some kind of language that the underlying machine can understand. This underlying language is usually called assembly language, but Java is a little bit different in this respect. Instead, the compiler generates bytecode, which are 0s and 1s that a virtual machine will interpret and run on the underlying computer. This design decision was made to make Java executables to run on different machines without having to be recompiled.
Visual Studio Code
You will need at least three types of tools: (1) an editor–where you actually write the Java source code, (2) a compiler–explained in the introduction, and (3) a virtual machine–to run the compiled code. Luckily, when we download all of these tools, they can be integrated in the editor to make your job slightly easier. This is called an integrated development environment (IDE).
We will be using Visual Studio Code (VSCode for short) as our IDE. There are MANY different tools, and many textbooks use Netbeans, which is an IDE made by Oracle–the company that bought Java.
Download
Before you download VS Code, download and install the Java runtime: https://www.oracle.com/java/technologies/downloads/

After you’ve downloaded and installed Java, head to: https://code.visualstudio.com/
The website will try to autodetect which tool you will need, since it depends on which operating system you are running (either Mac, Linux, or Windows). I am running Windows, so it wants me to download for windows.
Run and Install Extensions
When you install and run VSCode, you should see the following:
Configure Java Extensions
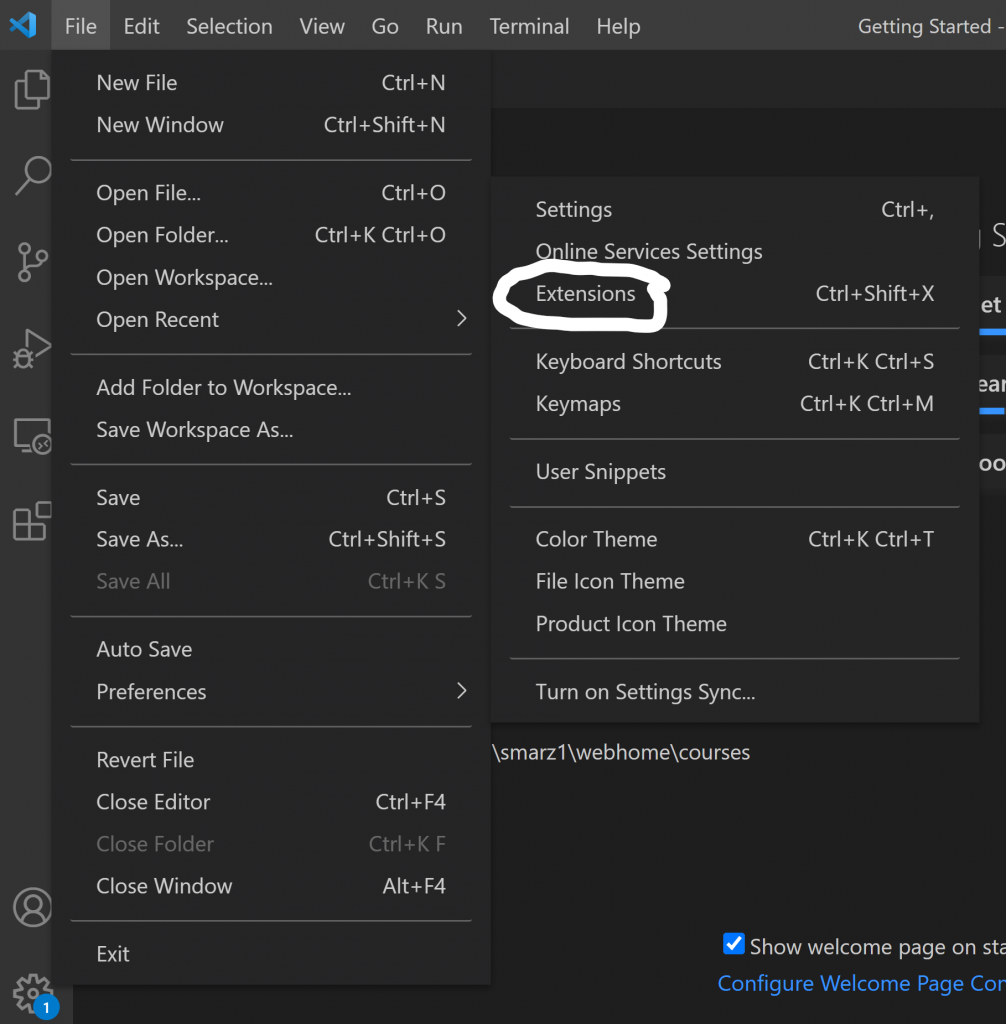
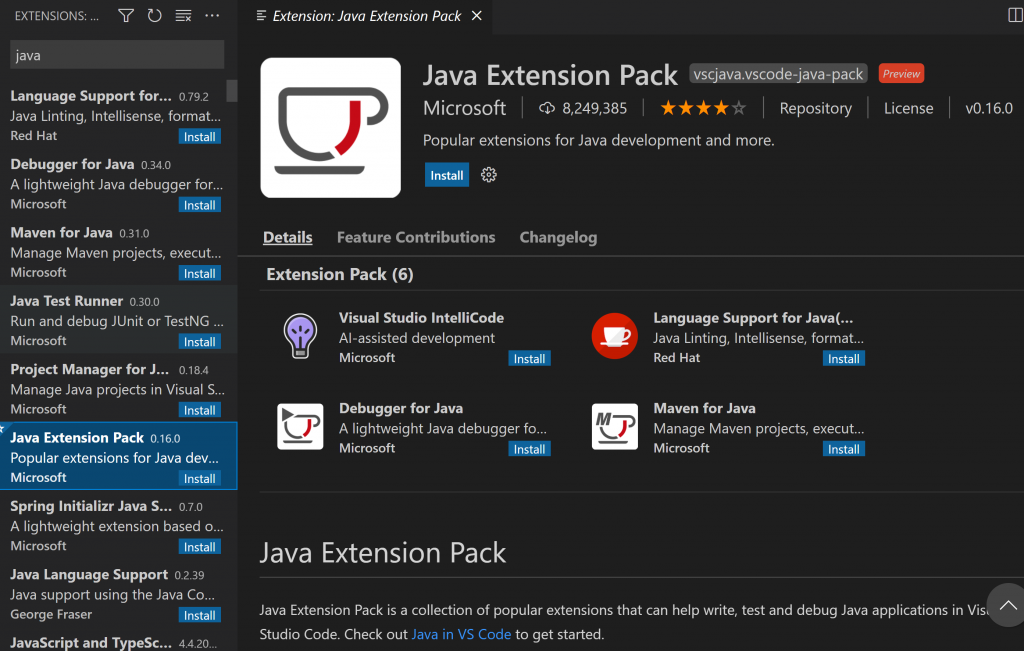
You now have the editor, so now you need the compiler and virtual machine. We can install these through VSCode through the extensions menu option.
In extensions, search for “Java”:
VSCode is now fully ready to go to edit, compile, and run Java files!
Testing
Troubleshooting is the hardest, and I cannot put all of the problems you might run into here. In fact, I probably have no idea how your system is different than mine. Luckily, VSCode has a good interface to tell you what’s wrong. However, if you do run into trouble, don’t hesitate to ask for help. Whether it’s in person or over Zoom, we can assist you in getting your environment properly set up.
Create a new java file called test.java.

This will create a file called Untitled-1. When we save the file, it will ask us for a name.

When I save, I can navigate somewhere and save it as test.java.

Now we can write our first program. In Java, we create a class with the same name as the file.
class test {
}
A class is just a way to group data within a name, in the case above, test.
Java needs to know where to start executing your code. There is a defined entry point called main. It has to be defined specifically, and this will be the same for every Java program you write.
class test {
   public static void main(String[] args) {
   }
}
The public above means that it can be seen outside of the class itself. We will cover classes more in depth as the course progresses. The static means that main is part of the class, but it doesn’t need access to anything inside of it, such as variables or other functions. The void means that main doesn’t output any data. Main just runs instructions. The parentheses start the parameter list. In the case above, we have one parameter called args. The data type of the parameter is a string array, denoted by String[]. The square brackets means that it is an array, which means that we can have multiple args.
Args is short for arguments. When we run a program, we can provide that program with arguments to change the behavior of the program. For example, the ls (list) command can take arguments to change how it lists files and directories.
~> ls
test.class  test.java
~> ls -l
total 8
-rw-rw-r--. 1 smarz1 smarz1 462 Aug  4 11:50 test.class
-rw-rw-r--. 1 smarz1 smarz1 292 Aug  4 11:50 test.java
~>
The argument -l means to list files and directories one line at a time, and give additional information about each.
In the case above, ls is an argument, and in the case of ls -l, -l is the first argument. This is why we need the arguments inside of an array. NOTE: When you start learning C++ after this course, the name of the program itself is the first argument! So, in the case above, ls would be the first argument in C++ and -l would be the second in C++.
We can output information to the screen using System.out.print or System.out.println. System.out.print will just print exactly what you give it, whereas System.out.println will print exactly what you give it and then move to the next line.
class test {
   public static void main(String[] args) {
      System.out.println("Arguments are:");
      for (String arg : args) {
         System.out.println(arg);
      }
   }
}
Don’t worry about the for, but just know that the code above will print out each and every argument line-by-line. The code above will print the following.
~> java test
Arguments are:
~> java test a b c
Arguments are:
a
b
c
~>
As you can see above, command line arguments are a way to get data into your program even before it runs!
Do NOT Create Java Projects (DO NOT!)
VSCode will allow you to create a “project”. However, this is more involved and will give your code errors, such as “cannot find class with main method”.

Instead, only create a new file.

Then select Java:


Be sure to save the file as <classname>.java, where <classname> is the name you gave the class.

All of the interaction will be done through the terminal. You may ignore the “test.java is a non-project file, only syntax errors are reported”, since we’re using only single files.
Windows PowerShell
Copyright (C) Microsoft Corporation. All rights reserved.

Try the new cross-platform PowerShell https://aka.ms/pscore6

PS Z:\35>  z:; cd 'z:\courses\cosc230\projects\fa2021\35';
& 'c:\Users\smarz1\.vscode\extensions\vscjava.vscode-java-debug-0.35.0\scripts\launcher.bat'
'C:\Program Files\Eclipse Foundation\jdk-11.0.12.7-hotspot\bin\java.exe'
'-agentlib:jdwp=transport=dt_socket,server=n,suspend=y,address=localhost:51765'
'-Dfile.encoding=UTF-8' '-cp' 'C:\App\jdt.ls-java-project\bin' 'test'
1234
PS Z:\35>
All errors will be reported here, and all interaction will be done through the terminal.


